Here I'll explain how to start and complete a battle, use boost items, and get rewards.
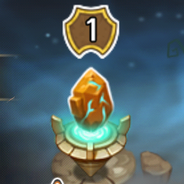
First of all, select your stage. There are two types of stages you will encounter.
First of all, select your stage. There are two types of stages you will encounter.
|
|
The first type I call "Regular battles." In them, you can summon all the wooparoo on your team at once. Some of them you can summon multiple times (check the creature information in the "Storage" menu to see how many of a specific wooparoo can be deployed per battle).
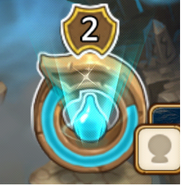
The second type I call "Summon gauge battles." They are indicated by the water droplet with the blue ring around it. In them, you have a blue bar that starts at 0, but the number will constantly increase as time passes. Any wooparoo you summon subtracts from that bar, and you can summon the same one multiple times. These battles are explained below.
After you select a stage, this screen pops up.
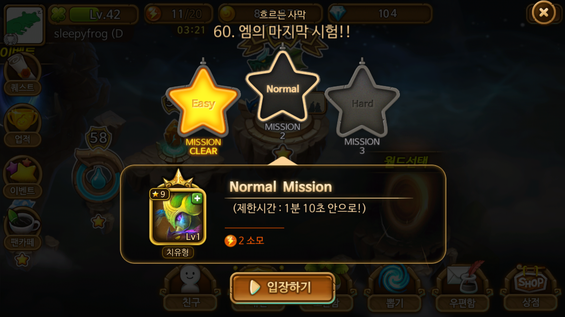
At first you can only select Easy difficulty. If you complete Easy, the next time you choose that stage you will play on Normal. The wooparoo you face, as well as their levels, are exactly the same, but you have a time limit (in this case, it's 1 minute and 10 seconds). The great thing is that the experience and mana balls you are rewarded with when you win are increased, even if the timer reaches zero first. You just won't move onto hard difficulty or get the gold star until you beat it within the time limit.
On Hard, it's exactly the same, but the time limit is even lower (as low as 40 seconds on most stages). As with Normal, you collect increased experience and mana balls for completing the stage, whether you get the gold star or not. The gold stars for beating higher difficulties serve no purpose other than collection purposes, and maybe there are some achievements for getting a certain number of them, I don't know. I explain how your rewards increase with difficulty down below, under the "You win" screen.
In any case, tap the bottom button "입장하기" to move on to this screen.
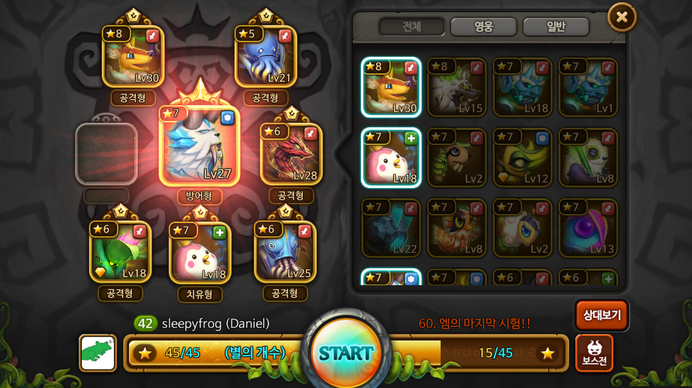
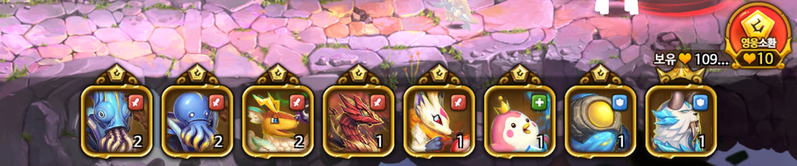
Here you can create your wooparoo team that will fight in the battle. Each wooparoo has a star value associated with it. You can not exceed your maximum star value shown at the bottom of the screen. Your maximum stars increases by one almost every time you level up.
If you tap the red button "상대보기" you can see the enemy's team.
The wooparoo you have in the center slot is a little special. If you have enough wooparoo assigned to other slots, and they are the same type (typically attack type), the central wooparoo will glow red, as shown above. When this happens, that particular wooparoo's stats will be improved. I don't believe it's possible to tell how much it's improved, and to be honest I can't tell the difference, but it's worth noting.
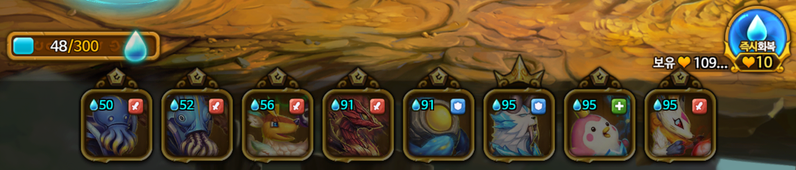
After you tap "Start", you will see the item shop screen.
If you tap the red button "상대보기" you can see the enemy's team.
The wooparoo you have in the center slot is a little special. If you have enough wooparoo assigned to other slots, and they are the same type (typically attack type), the central wooparoo will glow red, as shown above. When this happens, that particular wooparoo's stats will be improved. I don't believe it's possible to tell how much it's improved, and to be honest I can't tell the difference, but it's worth noting.
After you tap "Start", you will see the item shop screen.
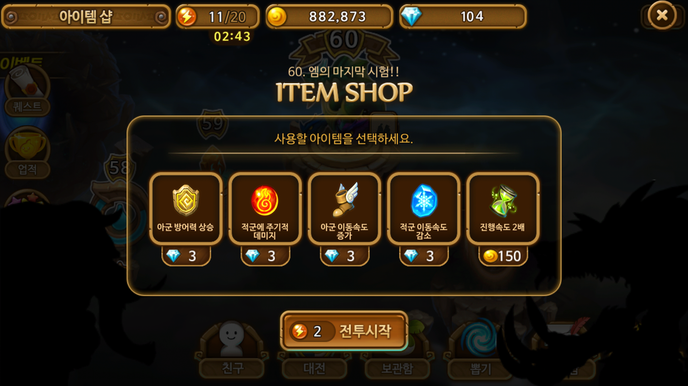
The item shop allows you to buy boosts for the current battle. From left to right, they are:
1. Yellow Shield: Raises your team's defense
2. Fire Ball: Periodically damages the enemy's team (I think).
3. Winged Boot: Raises your team's move speed.
4. Snowflake: Lowers the enemy team's move speed.
5. Hourglass: Increases the overall battle speed by x2 (helpful if grinding stages).
I've honestly never used any of the items except the hourglass, since I try to save my gems for buying new wooparoo. If I have trouble with a stage I usually just grind stages for food to strengthen my wooparoo or change my team up. There are some bosses that could be difficult without using an item boost though (ie: World 3 boss, see Tips and Strategies).
NOTE: The hourglass item also increases the speed at which the timer decreases in battle on Normal/Hard, so you can't use it to meet the time requirements.
After you're finished selecting any boosts you want to use, press the button "전투시작" to use two charge balls and start the battle.
|
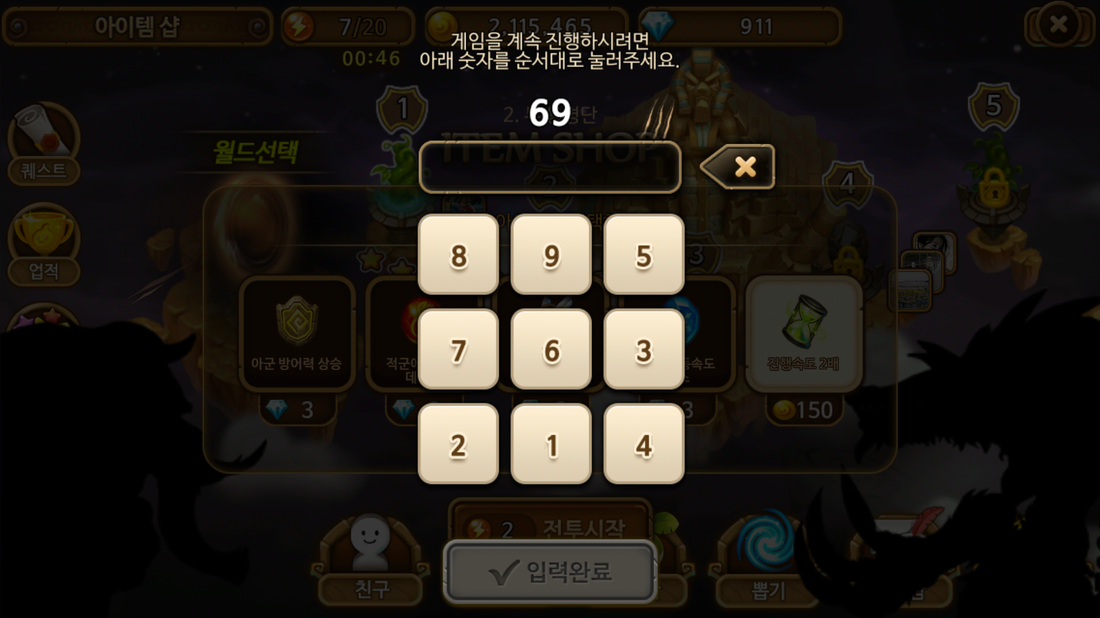
NOTE: Sometimes, before the Item Shop screen, this screen will appear where you have to enter the number shown. This is probably just a security measure to inhibit hackers/botters or whatever. Don't worry about it.
|
|
Anyways, onto the battle screen.
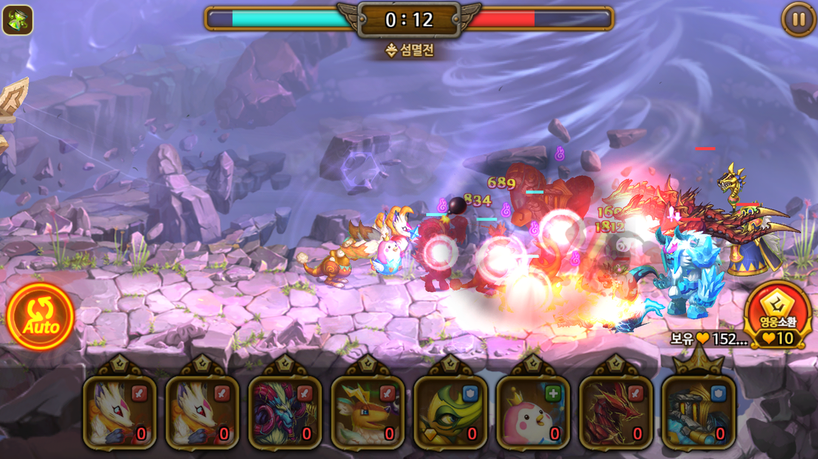
Your base is on the left. The enemy's is on the right. Tap the pictures of the wooparoo to send them out individually, or just tap the Auto button to automatically deploy them whenever they are available. At the top, you will see two bars, and a timer (Normal/Hard battles only). As you damage the enemy's wooparoo, the enemy's red bar will decrease. As your wooparoo are damaged, the blue bar will decrease. You can win by defeating all of the enemy's wooparoo, but it's not necessary. If any of your wooparoo are able to reach the enemy's base and hit it a few times, you will destroy it and win the battle. See Tips and Strategies for some tips on how to win some battles.
|
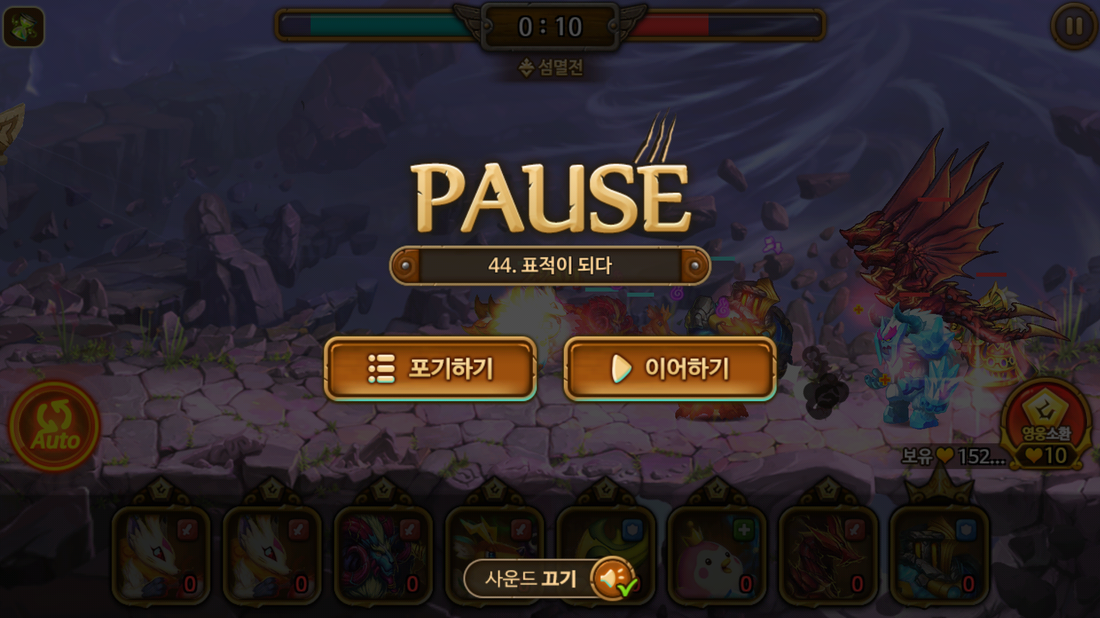
If you pause the game (upper right button) you will see this screen. The left button is surrender and the right one is continue. The button at the bottom allows you to disable sound.
Okay, now to explain the bottom part of the screen for both regular battles and summon gauge battles. |
|
This is a regular battle. You can see your wooparoo to summon and the number that can be summoned. If you can summon more than one of a particular wooparoo, there is a small cool-down before you can summon the next one.
The red button on the right is to summon a random 4+ star wooparoo to assist you in battle. It costs 10 friend points (hearts) to summon it, and you can only do it once per battle. Your total friend points are shown to the left of that. Add friends to increase the friend points you get.
The red button on the right is to summon a random 4+ star wooparoo to assist you in battle. It costs 10 friend points (hearts) to summon it, and you can only do it once per battle. Your total friend points are shown to the left of that. Add friends to increase the friend points you get.
This is a summon gauge battle. The summon gauge is on the left, and will continue to increase. The cost to summon each wooparoo is shown at the bottom. Each time you summon one, it decreases your gauge by that amount. The blue button on the right allows you to instantly fill your gauge to the max (once per battle) for 10 friend points. I find that it's easy to win these battles if I do that. Also, the nice thing about these battles is that you can keep summoning your strongest wooparoo if you feel like it, since there's no limit on how many you can summon.
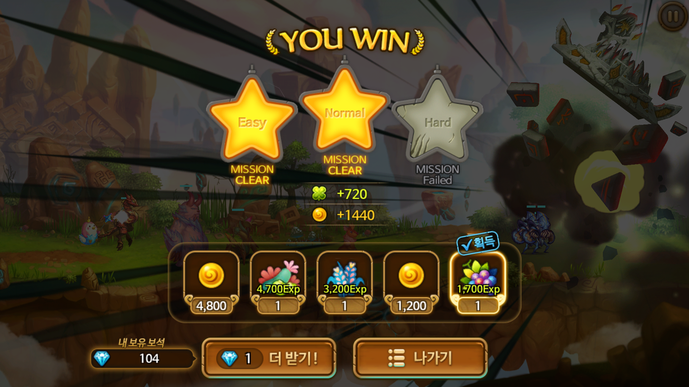
After you've won the battle, you earn experience and mana balls. The clover indicates experience earned towards your profile (in this case, +720). Under that, it shows the mana balls you earned (+1440 here). You also get a very low exp food item that automatically goes directly to your Storage (or Mailbox if your Storage is full).
Above, I said I would explain how your experience and mana balls increase with difficulty. Here's an example of how it works:
1. I beat stage X on easy, and get 620 exp and 1280 mana balls.
2. I beat stage X again within the Normal time limit, getting the Normal gold star, 660 exp and 1320 mana balls.
3. I beat stage X again but not within the Hard time limit, and get 720 exp and 1440 mana balls.
4. I beat stage X again within the hard time limit, getting the last gold star, 720 exp and 1440 mana balls (same).
5. I beat stage X again within or not within the time limit after already having all 3 stars, and get 780 exp and 1560 mana balls.
Basically, even if you can't beat a stage within the time limit, you can still get improved rewards if you win. Playing a stage where you already have all three stars has the best pay-off though.
Under that you acquire what I call "Roulette rewards." They are basically five random items, and can include:
C cards (garbage)
mana balls
food
10 gems (usually just in earlier worlds)
Vs. Balls
Roulette is incredibly important, because it's the only place you can consistently get good food items for strengthening your wooparoo
(see How to Raise Wooparoo). It's also the reason you want to progress to later worlds quickly, since the food rewards only get better between worlds, not stages.
Tap the bottom left button to randomly get one of the five rewards. After that, you have a choice. Press the right button "나가기" to exit back to the main Map screen, or the left button to try the roulette again using gems Each time you do it gets more expensive. First it's 1 gem, then 3, then 7, etc.
NOTE: You are always more likely to get the worst reward over the best one it seems, so don't go crazy with gem spending if you see a good reward. In this case, 1200 mana balls is the worst, followed by the 1700 exp food, then either the 4800 mana balls or 3200 exp food, and lastly the 4700 exp food. If you see a 10 gem reward, I wouldn't try spending more than 1 gem trying to get it, because it's usually the best reward and thus has the lowest probability of being acquired.
